

In today's digital landscape, user experience plays a crucial role in determining the success of a website or web application. One way to enhance user experience is by allowing users to personalize their browsing experience through theme customization. By enabling theme switching, you empower your users to select a design that resonates with their preferences, creating a more engaging and enjoyable interaction with your app.
With the rise of frameworks like NEXT.js, building powerful and responsive web applications has become more accessible than ever. NEXT.js, a popular React framework, offers a rich set of features and benefits, including server-side rendering, automatic code splitting, and optimized performance. In this blog, we will leverage the flexibility of NEXT.js to add a theme-switching feature seamlessly.
Throughout this article, we will guide you step-by-step through the process of implementing theme switching in your NEXT.js app using app router. The plugin we are going to use is next-themes along with Tailwind CSS.
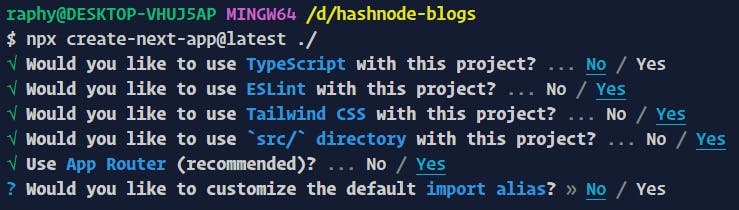
STEP 1: Setting up a project using create-next-app
go to your terminal and type npx create-next-app@latest to initialize the NEXT application then set up your next app by choosing the given options. You can choose yours. But for this project, we need Tailwind and App Router enabled. So, carefully say Yes to them :)
When the project creation is done we can start our work. We won't go into a fancy UI as that is not our goal.
STEP 2:Installing 'next-themes' and setting up the theme provider
open your terminal and type npm install next-themes

- Creating a component called Providers.jsx which will provide our ThemeProvider Wrapper

Providers.jsxmust be using the client. So, add'use client'on the top of the providers component.//Providers.jsx 'use client'now import ThemeProvider from the 'next-themes'
  //Providers.jsx
  import {ThemeProvider} from 'next-themes'
create a wrapper component using
ThemeProviderso that we can wrap the whole app with this. And finally, the whole file will look like this.'use client' import {ThemeProvider} from 'next-themes' export function Providers({ children }) { return <ThemeProvider>{children}</ThemeProvider> }Now its time to set up out
layout.jswhich initially looks like this.import './globals.css' import { Inter } from 'next/font/google' const inter = Inter({ subsets: ['latin'] }) export const metadata = { title: 'Create Next App', description: 'Generated by create next app', } export default function RootLayout({ children }) { return ( <html lang="en"> <body className={inter.className}>{children}</body> </html> ) }Here
Import the providers component
import { Providers } from './Theme/Providers'Wrap the body with the providers and add
suppressHydrationWarningto the html tag....... ...... ...... export default function RootLayout({ children }) { return ( <html lang="en" suppressHydrationWarning > <Providers> <body className={inter.className}> {children} </body> </Providers> </html> ) }There's a small tweak to do in the Tailwind config file. Add
darkMode : 'class'to the tailwind config file.
///tailwind.config.js


/** @type {import('tailwindcss').Config} */
module.exports = {
  content: [
    './src/pages/**/*.{js,ts,jsx,tsx,mdx}',
    './src/components/**/*.{js,ts,jsx,tsx,mdx}',
    './src/app/**/*.{js,ts,jsx,tsx,mdx}',
  ],
  darkMode:'class',    //add this to your config file
  theme: {
    extend: {
      backgroundImage: {
        'gradient-radial': 'radial-gradient(var(--tw-gradient-stops))',
        'gradient-conic':
          'conic-gradient(from 180deg at 50% 50%, var(--tw-gradient-stops))',
      },
    },
  },
  plugins: [],
}
STEP 3: Using the Theme Switcher
At this point, you are good to go to use the dark mode switcher. Let's create the simplest one. open the Page.js
'use client'
import Image from 'next/image'
import { useTheme } from 'next-themes'
export default function Home() {

  const {theme, setTheme} = useTheme()

  return (
    <main className="flex justify-center items-center h-screen gap-4">
        <button onClick={()=> setTheme('light')} className='bg-white rounded text-slate-950 px-4'>Light</button>
        <button onClick={()=> setTheme('dark')} className='bg-white rounded text-slate-950 px-4'>Dark</button>
    </main>
  )
}
here useTheme is taken from the next themes. and then using it to switch themes in two-button events.
clear the global.css to restrict the styles coming from that
add some dark classes to the body
  <body className="dark:bg-slate-950 dark:text-white ">
            {children}
  </body>
Now run the project with
npm run devvisit localhost:3000/ and you will get the theme switcher. Clicking the Light button will change the background to white and Dark will make the lights off.
Thanks for reading. Hope it helps you set up the theme in Next JS in the app directory system. Happy Learning ❤️